
How to Mount your IPTECHVIEW Universal Business Security Cameras

Professional accessories mounting procedures are important for the success and longevity of cameras.
In a long-term service partnership and recurring revenue and environment longevity of the equipment sold and minimization of service calls affect both customer experience and technology partner  bottom line.

Security camera mounts and brackets provide the camera with the support required to be installed properly to record video footage on a wall, ceiling, or pole. These support structures come in many forms, with some being physically pronounced by extending the camera out or fitting the camera into a designated surface. Most security cameras do not come with mounts or brackets. 

DOME CAMERAS (Accessories)

IPTECHVIEW Universal Dome camera accessories

Hardware Installation

Here is the ceiling mount procedure using only the camera (without additional accessories) as an example, and the wall mount process is similar to the ceiling mount. 

1. Locate the positions of the holes. Paste installation positioning stickers on the ceiling. Lead the cables through the hole in the wall.

2. Drill holes into the ceiling.

3. Mount the plastic rivets of self-tapping screws.
4.Mount the camera. Connect all cables of the ceiling and the camera, lead self-tapping screws through the guide holes in the camera base and fix the camera on the ceiling by using a screwdriver.


5. Adjust the monitoring direction of the lens. Tighten the screws after vertically adjusting the lens.


6. Attach the inner cover and lock it into the base buckle.


7. Mount the transparent dome cover. Mount the camera. Align the grooves (non-tail cable grooves) of the transparent dome housing to the buckle of the base, and push up the dome housing to fix it, as shown in the following figure.


BULLET CAMERAS (Accessories)

Hardware Installation

Here is the ceiling mount procedure using only the camera (without additional accessories) as an example, and the wall mount process is similar to the ceiling mount.

1. Locate the positions of the holes.


This image has an empty alt attribute
2. Drill holes into the wall.

3. Mount the plastic rivets with self-tapping screws.

4. Screw the lock nut to loosen the universal joint before attaching your camera to the wall.


This image has an empty alt attribute
5. Mount your camera into the wall and connect all cables.


This image has an empty alt attribute
6. Adjust the monitoring directing.

7. Power on your camera and adjust the images.


This image has an empty alt attribute

TURRET CAMERAS (Accessories)

Attach the sticker to the ceiling. Drill holes according the sticker.

Hardware Installation

Here is the ceiling mount procedure using only the camera (without additional accessories) as an example, and the wall mount process is similar to the ceiling mount.

1. Attach the sticker to the ceiling. Drill holes according to the sticker.


This image has an empty alt attribute
2. Insert the plastic anchors. Drill a hole to lead cables out.

3. Remote the bottom ring.

This image has an empty alt attribute
4. Connect the cable and then secure the dome.

5. Adjust the monitoring direction.

This image has an empty alt attribute
6. Mount the bottom ring.

7. The above steps are for concealed installation. For an open installation, leave the cables out from the open slots on the bottom ring.


This image has an empty alt attribute

HEMISPHERIC CAMERAS (Accessories)

Hardware Installation

Here is the ceiling mount as an example as the wall mount process is similar to the ceiling mount. 

1. Locate the positions of the holes. Paste installation positioning stickers on the ceiling. Lead the cables through the hole on the wall.

2. Drill holes into the ceiling.

3. Mount the plastic rivets of self-tapping screws.

4. Mount the camera. Connect all cables of the ceiling and the camera, lead self-tapping screws through the guide holes in the camera base, and fix the camera on the ceiling by using a screwdriver.

5. Attach the inner cover. Mount the camera. Align the grooves.


PARTNER RECOMMENDATION:

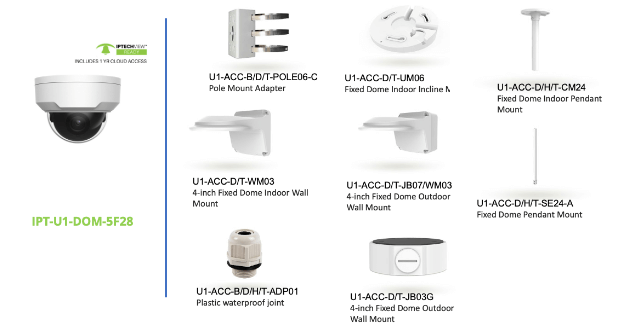
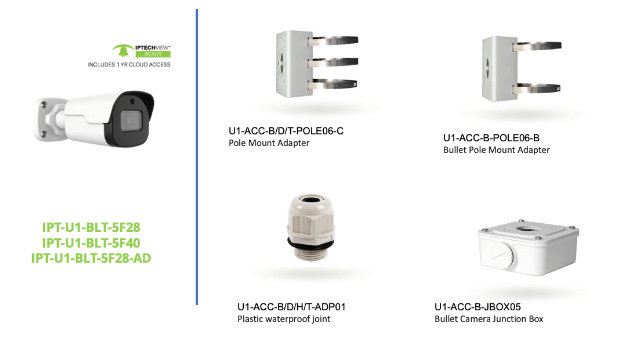
Always order the accessories along with your primary order for all exterior surface mounted cameras.

We recommend you always carry a couple of the IPT-POE-EXT2 (POE EXTENDER/POE PORT DUPLICATORS) and keep a few (minimum 2) to be used with any of the 4 main camera models Bullet, Turret, Dome, and Hemispheric mounting accessories, in your truck. They are small and inexpensive and will ensure you are always covered. 

Author

jennyUser Summary